Research Log: Page 33
Extracted posts from the KLOV Big Blue thread. View original page 33 on KLOV ↗
Post #641 — sfernandes, May 24, 2018
- acblunden2 said: Right on. We are neighbors! Let me know when you get yours. Working on getting mine all up and running now.
- Might be able to help you as I am crossing that bridge soon. Will bondo/patch-up my SSF2 OG panel so that the routing edges are exact, then need to source some clear acrylic. Will be using 1.5mm acrylic over Lexan/polycarbonate for these reasons. There will be no screw mount drill holes on the panel edges since there seems to be some variances as to where those holes are from panel to panel. Only the holes for the buttons and joysticks will be cut. Won’t be cheap however. Looks like the sheet is around $40 alone, then factor in shipping to Canada. Holler at you when I get there. Click to expand…
Measurements:
- 1.5mm
Post #642 — acblunden2, May 30, 2018
- sfernandes said: Sounds good let me know. Thanks Click to expand…
Images:
- Not archived:
https://forums.arcade-museum.com/attachment.php?attachmentid=353893&stc=1&d=1527714905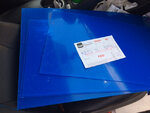
Post #643 — sfernandes, May 31, 2018
- acblunden2 said:
- Swooped up some 3/16 clear acrylic from Tap Plastics (3/16’s is the right thickness). All cut to order. I’ll need to route them to shape from here. Three of them are earmarked for the my Gen 2’s. Then I bought another one for one of my Gen 1’s. Stuff is cheaper than I thought. Should have one worked up for my repro panel this weekend. Then will work on finishing patching up my OG panel and make the cut from that one.
- Holler at you then. Click to expand…
Images:
- Not archived:
https://forums.arcade-museum.com/attachment.php?attachmentid=353893&stc=1&d=1527714905
Serial/tag references:
Gen 2— _ to shape from here. Three of them are earmarked for the my Gen 2’s. Then I bought another one for one of my Gen 1’s. St…_Gen 1— for the my Gen 2’s. Then I bought another one for one of my Gen 1’s. Stuff is cheaper than I thought. Should have one wo…
Measurements:
- 1’
- 16’
- 2’
Post #644 — acblunden2, May 31, 2018
- Cool. Flush trim router bit for the button holes. Then a quarter round bit for the edges and joystick holes and you’ll be set.
Post #645 — sfernandes, May 31, 2018
- acblunden2 said: Cool. Flush trim router bit for the button holes. Then a quarter round bit for the edges and joystick holes and you’ll be set. Click to expand…
Post #646 — sorwah, Jun 6, 2018
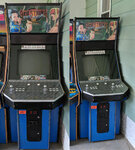
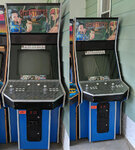
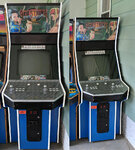
- Need to put some fresh T-molding on the SF3 cab. I can’t decide though so I made some mock-ups and would like to get your opinions on it. Note, the control panel’s molding is an aluminum boat siding which I like for the chrome-ish finish that keeps the plexi installed without having to drill any holes in it. So that edge will remain regardless of the other molding on the cabinet.
- (Black, Gray, White)
Images:
Post #647 — acblunden2, Jun 7, 2018
- The gray is lighter IRL than displayed in your mock-up and quite a striking contrast against dark blue. If your cab is in a well lit area during play, I would go with that. Plus it is OEM. If you’re always going to be in a darkened room, wouldn’t matter either way.
- Also, if you are really adventurous, cut a new CP underpanel just so that you can cut a new offset slot for the tmolding. Then get wider tmolding. 13/16ths just for the CP edge should work depending on your plexi thickness. The wider tmolding will do the same thing the boat molding doe:, hold your plexi in place, plus look better. That under panel is just a piece of plywood anyway. Use a router to trace all around it to fab a replica. You can get offset tmolding too, but then you’d have to match colors.
Post #648 — sorwah, Jun 7, 2018
- acblunden2 said: The gray is lighter IRL than displayed in your mock-up and quite a striking contrast against dark blue. If your cab is in a well lit area during play, I would go with that. Plus it is OEM. If you’re always going to be in a darkened room, wouldn’t matter either way.
- Also, if you are really adventurous, cut a new CP underpanel just so that you can cut a new offset slot for the tmolding. Then get wider tmolding. 13/16ths just for the CP edge should work depending on your plexi thickness. The wider tmolding will do the same thing the boat molding doe:, hold your plexi in place, plus look better. That under panel is just a piece of plywood anyway. Use a router to trace all around it to fab a replica. You can get offset tmolding too, but then you’d have to match colors. Click to expand…
Post #649 — acblunden2, Jun 7, 2018
- Ahh, ok. Fresh gray molding will be closer to your boat molding in shade.
- How many BB’s do you have over there?
Post #650 — sorwah, Jun 7, 2018
- acblunden2 said: How many BB’s do you have over there? Click to expand…
Post #651 — acblunden2, Jun 8, 2018
- How much revenue is it pulling in and how much do your charge per game? Just curious these days.
Post #652 — sorwah, Jun 8, 2018
- $0.25 a play. And makes about $50 to $80 a month depending on the season.
Post #653 — sfernandes, Jun 19, 2018
- Hey guys,
- Would anyone happen to know or have a picture or video showing how the second gen big blue Q-Sound original speakers mount inside the cabinet?
- I aquired a set of originals with amp etc and I have one of those second gen blues with no Q-Sound which I’m converting to a Q-Sound.
- I know where they mount to, my question is really how do they mount if that makes sense. My cabinet has no holes where the screws would go, so do I just get wood screws the right length so it doesn’t protrude to the other side and just screw it into the wood and hope with vibration etc it will never fall? Or do the Q-Sound cabs have metal dowels I think there called inside the wood on the cab to screw it in? Or is it just screwed into the wood?
- Does what I’m asking make any sense? It’s very hard to explain.
Post #654 — DuffCon, Jun 19, 2018
- I looked a bit, I know there are some pics of the speaker mounts earlier in the thread.
- I had a similar thought for my NQS big blue, but my feeling is that there are a LOT more Qsound cabs in the world than the NQS ones; a rare one to be sure.
Post #655 — sfernandes, Jun 19, 2018
- DuffCon said: I looked a bit, I know there are some pics of the speaker mounts earlier in the thread.
- I had a similar thought for my NQS big blue, but my feeling is that there are a LOT more Qsound cabs in the world than the NQS ones; a rare one to be sure. Click to expand…
Post #656 — acblunden2, Jun 19, 2018
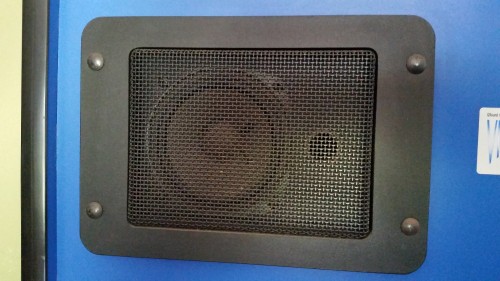
- The Q-sound speakers are held in place by two big C-brackets (IIRC, I don’t have it in front of me right now). Those brackets are fastened into place by bolts that go through the speaker fascia in the front that also go through the cab in the pics that you see. That fascia is just a piece of wood, wrapped up in thick laminate.
Images:
Post #657 — acblunden2, Jun 19, 2018
- Actually, here is a better pic of those brackets. They are more like S-brackets.
- https://www.arcade-projects.com/forums/index.php?thread/5675-my-capcom-big-blue-lives/
Post #658 — sfernandes, Jun 20, 2018
- acblunden2 said: The Q-sound speakers are held in place by two big C-brackets (IIRC, I don’t have it in front of me right now). Those brackets are fastened into place by bolts that go through the speaker fascia in the front that also go through the cab in the pics that you see. That fascia is just a piece of wood, wrapped up in thick laminate.
Images:
Post #659 — acblunden2, Jun 20, 2018
- Yeah, you’re right. I don’t have it in front of me. Won’t be in front of me until the weekend. Was posting the description from memory. Those bolts hold the fascia and grill in place and they do go through the cab speaker panel.
- The speakers themselves are mounted with brackets across the horizontal dimension. Here is that photo from that other thread so you can see how they held in place.
Images: